Photos to fabric, via your computer
Introduction: How to get the fabric through the printer
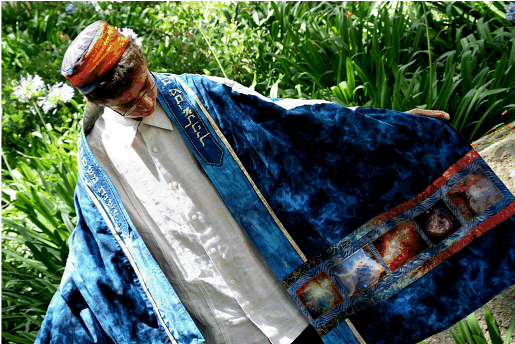
My good experiences with photo transfer have been with my computer's inkjet printer. That, for example, is how I put the magnificent intergalactic NASA imagery above, onto my son's bar mitzvah tallis.
When I tell people I did the photo transfer with my computer's printer, they always ask: How did you get the fabric through the printer? (I think they imagine me shoving tallitot into my Epson with a fork.)
Fortunately, it's really much easier (and safer) than that.
Steps: Pick white, cream, or light-colored fabric. Wash and dry. Press it to the waxy side of freezer paper, either commercial freezer paper from the supermarket (Reynolds); or a heavier-duty brand made for crafters, available in many quilt stores and catalogues.
(Alternatively, for extra insurance and slightly more cost, you can adhere the fabric to full-page size adhesive labels, like Avery labels. These labels can be reused many times.)
After the fabric is securely pressed onto the backing, and wrinkle-free, you may need to trim it to exactly 8 1/2" by 11". (Or, trim it before pressing. Or, before AND after!).
Next, put the paper-backed fabric through your computer printer, as if it were a piece of cardstock, watching (and praying) that it doesn't jam. (Here's a handy tutorial about printout settings: http://www.joehesch.com/. )
That wasn't hard, was it? OK, some printers make it more difficult than others; you may need to trim back or tape over the leading edge, if you have a balky printer. But other than that, it should work fine.
And if you are doing a project that will never encounter liquid - like a wall-hanging you plan to frame - you can stop reading now and start printing!
But if you're making something that might need washing, or upon which the bar mitzvah might spill grape juice, keep reading.
Printer ink not a forever friend
Here's the bad news: With most printer inks, the image will dissolve the first time it encounters water. All "dye-based" printer inks are washaway. (The support material for your printer will tell you if it uses dye-based inks).
The more permanent inks are the so-called "pigment inks." (Mnemonic: Permanent and pigment begin with P).
Many Epson printers, and now some HP and Cannon printers, offer pigment inks. My Epson, a CX4800, has a permanent DURAbrite pigment ink. Epson's Ultrachrome inks are also permanent. (While these printers can be inexpensive, the ink, of course, is not.)
If you do have a pigment ink, you can just print it, sew it, and not worry...maybe? Even with pigment inks, some artists recommend a light finishing spray with a clear acrylic, like Krylon, to prevent rub-off in the long term. And even pigment inks, some say, benefit from the types of treatments or products listed below, to make them even more permanent.
If you have the more common dye-based ink, the fabric MUST be treated (before and/or after printing), either by you or a manufacturer, to achieve permanence. And this is where we get into time and/or money.
PRETREATING FABRIC YOURSELF TO MAKE PRINTER INK PERMANENT
The best known product for this purpose is Bubble Jet Set 2000. (aka BJS), which I used with some success back when I had an HP dye-ink printer.
Bubble Jet Set is a (somewhat toxic) chemical fluid. Wearing gloves, you squeeze it through your fabric, let the fabric soak for five minutes, hang it to dry (over something clean and plastic - not untreated wood, which can leave a stain). Then iron the fabric to freezer paper as described above. Put it through the printer. Let the results cure for a half-hour, rinse with Bubble Jet Rinse, a laundering product. Dry, and it's ready to sew.
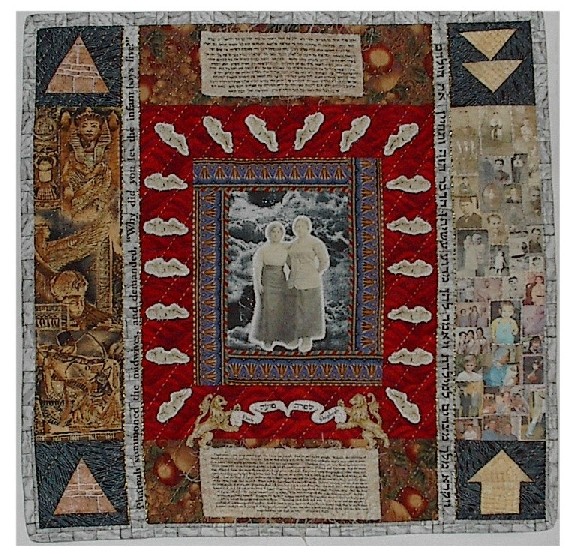
It leaves the fabric soft, and you can iron as desired. Plus, you can use any fabric you want. (For the Women of Biblical Proportions project at right and on the Passover 2 page, I printed the large Hebrew and English letters onto a commercial fabric depicting a brick wall. Click on image for a better view).
However, I have found that after several washings, the BJS images lightened more than I would like.
Also, the bottle MUST be fresh - fluid from old, reused, or opened bottles hasn't worked well for me. But you can't beat the price: Each 8 1/2" by 11" sheet of fabric will run about 25 cents. More information at:
This is the expensive option ($2 sheet and up), and the most convenient. There are printer-ready cottons, silks, even organza, each on a paper or plastic backing and ready to slide into your printer. Read labels to make sure the fabric can be washed in water afterwards (some must be dry cleaned). Rolls are less expensive than sheets. Here are just a few of the choices:
Made by various manufacturers, sold in stationary and craft stores, quilt stores and catalogues. They work wonderfully - for my friend Sue. She scans photos into her computer, plays with them in Photoshop, including flipping to a mirror image. (A copy store can do this, too). Then she loads the transfer paper into her computer printer, and prints the image. Next, she irons the image onto fabric. (It's the ironing part that doesn't work for me - no matter how long or hard I iron, I can't get the image to transfer all the way. I think my iron is flawed). But Sue's images are beautiful.
It does stiffen the fabric slightly. And unfortunately, you cannot directly iron the top of the fabric afterward (for fear of lifting the image off) That also means you can't put fusible web on the back. Cost per sheet runs about $2.
LEARN MORE ABOUT PRINTING IMAGES FROM YOUR COMPUTER
Copy shop
You might be able to bring iron-on transfer paper, your fabric and your photograph to a copy shop. In theory, they will copy your image onto your paper in their machine (though I've heard that some copy shops balk). A shop that offers tee-shirt making services is an even better bet, and they may have their own heat transfer paper. They might also be willing to do the pressing onto your fabric, on one of their heavy-duty presses.
Vodka and beyond
There are many, many other ways to put photos on fabric. Some are more legible, washable, non-toxic, ironable, and/or wearable than others. They run a fascinating gamut from decoupage with fabric medium, to packing tape transfers, to turpentine, to vodka. An excellent book on the subject is: 'Imagery On Fabric, A Complete Surface Design Handbook,' by Jean Ray Laury (C&T Publishing, 1997).
The technology (and creativity) in this area changes constantly, so every now and then, it's a good idea to google "Photos to fabric" and "image transfer."
Introduction: How to get the fabric through the printer
My good experiences with photo transfer have been with my computer's inkjet printer. That, for example, is how I put the magnificent intergalactic NASA imagery above, onto my son's bar mitzvah tallis.
When I tell people I did the photo transfer with my computer's printer, they always ask: How did you get the fabric through the printer? (I think they imagine me shoving tallitot into my Epson with a fork.)
Fortunately, it's really much easier (and safer) than that.
Steps: Pick white, cream, or light-colored fabric. Wash and dry. Press it to the waxy side of freezer paper, either commercial freezer paper from the supermarket (Reynolds); or a heavier-duty brand made for crafters, available in many quilt stores and catalogues.
(Alternatively, for extra insurance and slightly more cost, you can adhere the fabric to full-page size adhesive labels, like Avery labels. These labels can be reused many times.)
After the fabric is securely pressed onto the backing, and wrinkle-free, you may need to trim it to exactly 8 1/2" by 11". (Or, trim it before pressing. Or, before AND after!).
Next, put the paper-backed fabric through your computer printer, as if it were a piece of cardstock, watching (and praying) that it doesn't jam. (Here's a handy tutorial about printout settings: http://www.joehesch.com/. )
That wasn't hard, was it? OK, some printers make it more difficult than others; you may need to trim back or tape over the leading edge, if you have a balky printer. But other than that, it should work fine.
And if you are doing a project that will never encounter liquid - like a wall-hanging you plan to frame - you can stop reading now and start printing!
But if you're making something that might need washing, or upon which the bar mitzvah might spill grape juice, keep reading.
Printer ink not a forever friend
Here's the bad news: With most printer inks, the image will dissolve the first time it encounters water. All "dye-based" printer inks are washaway. (The support material for your printer will tell you if it uses dye-based inks).
The more permanent inks are the so-called "pigment inks." (Mnemonic: Permanent and pigment begin with P).
Many Epson printers, and now some HP and Cannon printers, offer pigment inks. My Epson, a CX4800, has a permanent DURAbrite pigment ink. Epson's Ultrachrome inks are also permanent. (While these printers can be inexpensive, the ink, of course, is not.)
If you do have a pigment ink, you can just print it, sew it, and not worry...maybe? Even with pigment inks, some artists recommend a light finishing spray with a clear acrylic, like Krylon, to prevent rub-off in the long term. And even pigment inks, some say, benefit from the types of treatments or products listed below, to make them even more permanent.
If you have the more common dye-based ink, the fabric MUST be treated (before and/or after printing), either by you or a manufacturer, to achieve permanence. And this is where we get into time and/or money.
PRETREATING FABRIC YOURSELF TO MAKE PRINTER INK PERMANENT
The best known product for this purpose is Bubble Jet Set 2000. (aka BJS), which I used with some success back when I had an HP dye-ink printer.
Bubble Jet Set is a (somewhat toxic) chemical fluid. Wearing gloves, you squeeze it through your fabric, let the fabric soak for five minutes, hang it to dry (over something clean and plastic - not untreated wood, which can leave a stain). Then iron the fabric to freezer paper as described above. Put it through the printer. Let the results cure for a half-hour, rinse with Bubble Jet Rinse, a laundering product. Dry, and it's ready to sew.
It leaves the fabric soft, and you can iron as desired. Plus, you can use any fabric you want. (For the Women of Biblical Proportions project at right and on the Passover 2 page, I printed the large Hebrew and English letters onto a commercial fabric depicting a brick wall. Click on image for a better view).
However, I have found that after several washings, the BJS images lightened more than I would like.
Also, the bottle MUST be fresh - fluid from old, reused, or opened bottles hasn't worked well for me. But you can't beat the price: Each 8 1/2" by 11" sheet of fabric will run about 25 cents. More information at:
- The BJS Fabric Printing list on Yahoo.
- The BJS manufacturer's page
- The BJS section of the webpage of art quilter Caryl Bryer-Fallert.
- As an alternative to BJS, SoftFabricPhotos.com offers a different fabric-treatment product used in a similar way. www.softfabricphotos.com .
This is the expensive option ($2 sheet and up), and the most convenient. There are printer-ready cottons, silks, even organza, each on a paper or plastic backing and ready to slide into your printer. Read labels to make sure the fabric can be washed in water afterwards (some must be dry cleaned). Rolls are less expensive than sheets. Here are just a few of the choices:
- Gloria Hansen recommends the Colorplus fabric (c) rolls
- Jeannie Spears of SoftFabricPhotos.com tested many different sheets for a series of articles in the January/February 2007, and March 2007 issues of Quilters Newsletter Magazine. She found EQ Printables were among the best. On that recommendation, I've been using the EQ Premium Cotton Satin Inkjet Fabric Sheets (283 thread count!) with great success. (I used it to print galaxies and star clusters for my son's tallit, at the top of this page).
Made by various manufacturers, sold in stationary and craft stores, quilt stores and catalogues. They work wonderfully - for my friend Sue. She scans photos into her computer, plays with them in Photoshop, including flipping to a mirror image. (A copy store can do this, too). Then she loads the transfer paper into her computer printer, and prints the image. Next, she irons the image onto fabric. (It's the ironing part that doesn't work for me - no matter how long or hard I iron, I can't get the image to transfer all the way. I think my iron is flawed). But Sue's images are beautiful.
It does stiffen the fabric slightly. And unfortunately, you cannot directly iron the top of the fabric afterward (for fear of lifting the image off) That also means you can't put fusible web on the back. Cost per sheet runs about $2.
LEARN MORE ABOUT PRINTING IMAGES FROM YOUR COMPUTER
- Excellent overview on quilter Gloria Hansen's website, at http://www.gloriahansen.com/inkjet.html. (Then gape at her awesome quilts.)
- A very informative commercial site is http://www.softfabricphotos.com.
- The place to ask specific questions and stay up on the ever-changing technology is the Yahoo Inkjet Fabric Printing Group, at http://groups.yahoo.com/group/inkjetfabricprinting/.
Copy shop
You might be able to bring iron-on transfer paper, your fabric and your photograph to a copy shop. In theory, they will copy your image onto your paper in their machine (though I've heard that some copy shops balk). A shop that offers tee-shirt making services is an even better bet, and they may have their own heat transfer paper. They might also be willing to do the pressing onto your fabric, on one of their heavy-duty presses.
Vodka and beyond
There are many, many other ways to put photos on fabric. Some are more legible, washable, non-toxic, ironable, and/or wearable than others. They run a fascinating gamut from decoupage with fabric medium, to packing tape transfers, to turpentine, to vodka. An excellent book on the subject is: 'Imagery On Fabric, A Complete Surface Design Handbook,' by Jean Ray Laury (C&T Publishing, 1997).
The technology (and creativity) in this area changes constantly, so every now and then, it's a good idea to google "Photos to fabric" and "image transfer."