This kind of quilt can be the ultimate bar or bat mitzvah present, graduation present, memory quilt or even chuppah. There's just one problem: Tee shirts and other garments must be tamed before they will play nicely in a quilt. Here's how I do it.

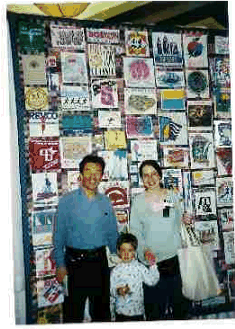
I evolved the this approach when my friend Takashi, right, and his wife, shlepped two large cartons, containing 75 of his marathon tee shirts, into my playroom, and asked me to turn them into one quilt. (If I'd used a 14" rectangle from each, we would have had a loose-fitting termite tent for the Hearst Castle).

 I call this approach "free-range," because, unlike most tee-shirt quilt patterns, it doesn't require that each garment piece be cut to the exact same size. It's "gonzo" because you make it up as you go along. It's "mondo" because it lets you use dozens of tee shirts in one bed quilt (Conventional tee-shirt quilts usually include no more than a dozen.)

The basic idea: Cut closely around each logo, and used narrow strips of quilters' cotton in-between, to equalize the pieces and fit them all together.
This approach works for making a quilt from almost any garments or fabrics that can be ironed at a moderate heat.

SUPPLIES

  • A reliable iron, with steam capacity (or a spray bottle of water.)
  • A thin cotton press cloth (or any clean piece of muslin).
  • A non-stick ironing sheet, such as a roll (or large piece) of parchment paper (from the supermarket); OR non-stick or Teflon press cloth, (available from the notions department of many fabric stores ), or clean scrap paper (no ink, print, or crayon marks).
  • Clothes and other meaningful fabrics. Tee shirts, Coffee bags, penants, socks, yarmulkes, backpacks, whatever.
  •  Light to medium-weight fusible interfacing. This is the secret ingredient!  Fusible interfacing is sold by the chain fabric stores (and sometimes by independent quilt stores).  I buy about a yard for every 5 tee shirts. If  in doubt, buy extra. This stuff is cheap.
  • Good-quality cotton quilting fabric in your choice of colors or designs, for the sashing (the strips of fabric between the pieces of clothing)  and the borders. Two yards minimum, for the front if your quilt, if it  will be larger than lap size. (Plus  enough for the back).
  •  Iron-cleaning product (sold in tubes in most fabric stores.)
  • Threads, light and dark, for piecing the clothing and fabric you're using.  Use strong thread for piecing. You may also want decorative threads in the quilting stages.
  • Sturdy batting, like Warm'n'Natural cotton batting. This will make for a heavy, warm quilt. Alternatively, you could skip the batting and just have a front and back.
  
HOW TO MAKE THE QUILT

1. Launder the garments.  If they have very  intense background color―especially  yellow or red―color bleeding may be a problem. To test, soak a corner in water, place the dripping wet corner on a paper towel, place a weight on top (shmaltz jars work great) and leave it alone for a half-hour. If the color leaches to the paper, treat the garment with Retayne   (from www.dharmatrading.com  or www.clotilde.com ), and test again.  If it still runs, don't use it.

 (Don't worry too much about holes or permanent stains. Like wrinkles, they add character, and/or you can do a graft.)

2.
  Cut all the way around the area of the garment that you want, in a fairly square or rectangular shape, adding plenty of extra space beyond what you think you'll need -  ideally 2  inches or more. This isn't a precise cut. If in doubt, leave more. If you must include seams or even part of the collar for a generous margin of error, that's okay. 

3. Repeat step #2
for all the garments, creating oversized, rough-cut squares and rectangles. Don't discard the unused portions yet.  Set them aside―you may need more pieces (like a logo from a sleeve) later.

4. Heat iron
to the setting specified on the interfacing.

5.
Test iron the fiber. If you're not certain of the garment's fiber content (or even if you are, and it isn't cotton or silk), test a small piece first at the temperature recommended by the fusible manufacturer. Make sure the fabric doesn't melt. If  it DOES melt, reduce the heat, and keep testing, until you find the highest possible setting at which the fabric isn't damaged. Then try pressing a bit of the fusible onto the fabric at that temperature. It will probably stick - but if it doesn't,  you must either (a) not use that garment in this quilt, or (b) go to plan B - stiffen that fabric some other way. (You could hand-sew a smaller piece of it to regular woven cotton fabric.)

6. Iron the blocks to the interfacing.
Unroll the interfacing and lay it on the ironing board so that the bumpy-plasticky side faces up, and the soft fuzzy side is down. Lay your first tee shirt piece on top, right side up. Use a press cloth between the iron and printed designs (ESPECIALLY if they're silk-screened---there'll be a texture difference you can feel). Press firmly, for the count specified by the directions, using steam. Start at the center of the piece and move out.  Be very careful to keep the face of your iron from touching the glue side of the fusible interfacing, or the silk-screened letters.  If this is a threat, use a non-stick press-sheet, parchment paper, or clean scrap paper, as a barrier between the iron and the interfacing. (Scrape the press-sheet clean every time you move it, or take a new piece of scrap paper. If the iron does get gunk on it - which it will - clean it before proceeding ).
   
 If you accidentally press a wrinkle into the garment, you can peel the interfacing away while it is warm, and and fix it.

(Note: You ONLY need interfacing if the garment is a knit fabric, or it's difficult to handle in some other way - it's stretchy, slinky, or very light weight. You do NOT need interfacing for 100% cotton woven shirts like say a nice Hawaiian shirt, or a Boy Scout uniform. They're strong and stable enough to go into a quilt as is! Interfacing is not only a lot of work, but it also adds more weight, so only use it the garment really needs it!)

7. Keep doing this
until all your squares and rectangles are more or less backed. Don't worry if your fusing job isn't perfect yet, and a few corners are hanging loose―you will still have another chance to cut  and fuse. 

8. Design!
Take all your rough-cut interfaced pieces to your floor, or your design wall, and brainstorm a layout.  You may want a chronological order, or use themes or colors as a guideline . You may want to highlight some pieces in a central area, surround them with an inner border of quilter's cotton, and then circle other pieces around them.

For Takashi's quilt above, the tee shirts were arranged chronologically in long vertical rows.

9. Do the math.
You have to figure out which pieces need to be what size. Some pieces will need to be made a bigger, some smaller. To make pieces smaller, trim your 'margin of error.' To grow them, use narrow strips of the background/sashing fabric. 

 For the marathon quilt, I laid out 7 columns of tees.  In each column, I identified the widest piece. Then I added one inch of sashing  (my quilters' cottons) to both sides of that widest  piece. All the other pieces in the same column now had to be widened to equal that measurement, using different widths of 'sashing'  fabrics for each. 

By laying them out, I also established an overall maximum vertical length for my columns, based on the longest one. Sashing strips were added to the tops and bottoms of individual pieces and columns, to make all the columns equal in height.

10. Start piecing.
Use a walking foot, a Teflon foot, or a metal foot, to sew interfaced fabrics. Beware of plastic presser feet - they drag on interfacing, making it difficult to slide through the machine.

11. Make a quilt sandwich and pin it.
The clothing layer on top, batting in the middle (or skip batting, for a thinner quilt), and a backing. Use a sturdy fabric for the backing.

12. Quilt it.
These quilts are quite a bit heavier and thicker  than the average, so machine quilting is a good idea. You might consider sending it out for longarm machine quilting if your quilt is too bulky to get through your home sewing machine. Or tie it at regular intervals. If it does have batting, don't even THINK about hand-quilting, unless you are willing to risk carpal tunnel, and/or months of aggravation.

13. Send me a picture!